Create new form
This is how you create a new form step by step.
For permission, please go to Ask for access to the KTH form service .
Once you have obtained permission to the service and have confirmed the terms, log in with your KTH account at www.kth.se/form .
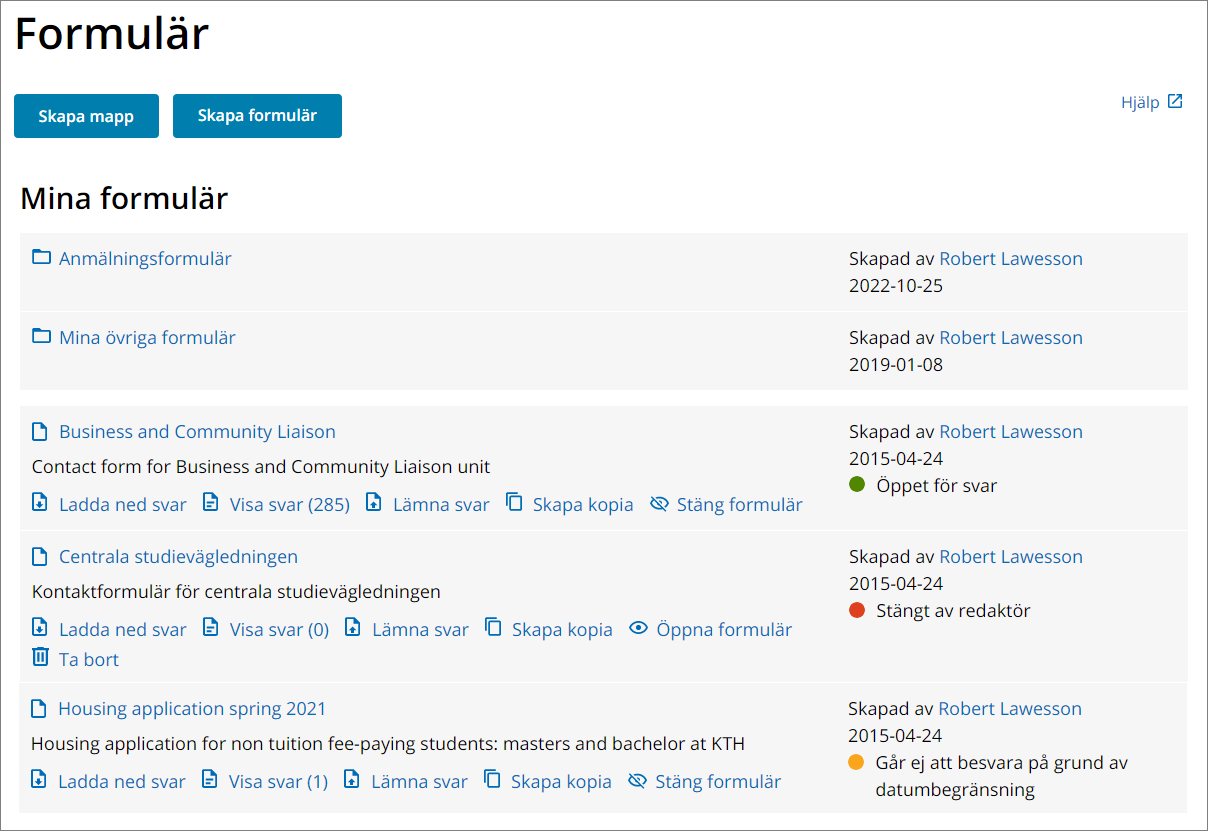
The form service home page lists the forms you have permission to edit and the folders with forms that you have permission to edit.
Click the "Create form" button at the of the list to create new form.

Folders
You can also create a new folder in which you collect forms. In the folder settings you can specify which people should have access to the folder. Hereafter referred to as editors.
Editors linked to a folder automatically get permissions to the forms contained in the folder.
You can create forms directly in the folder or associate existing forms with the folder via setting in the form. This is done via the drop-down list below the fields for the form's title and description. The drop-down list lists all the folders that you are authorized to access.
If you want to delete a folder, it must first be emptied on forms. This is done by deleting the forms or moving them to other folders.
Form management
When you create a new form, a view with a blank form will be displayed.
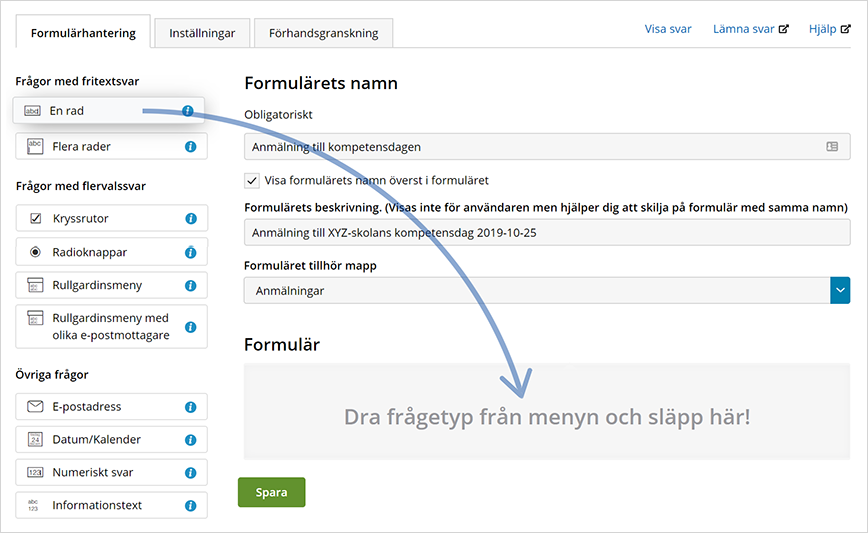
Start by entering the title and description text for the form. (The description text aims to distinguish forms that have the same title. It is not shown to the respondent.) Also, enter by check box if the title should appear in the public form.
If you have created your form in a folder, scroll list beneath description field shows which folder the form belongs to. If you want to tie your form to another folder, select it from the list. The form will then be listed in the specified folder.
Build the form
The left-hand menu lists the question types you can use in the form.
Learn more about the settings here .
To add a question to the form, click the question type with the left mouse button and drag and drop it into the form builder on the right.

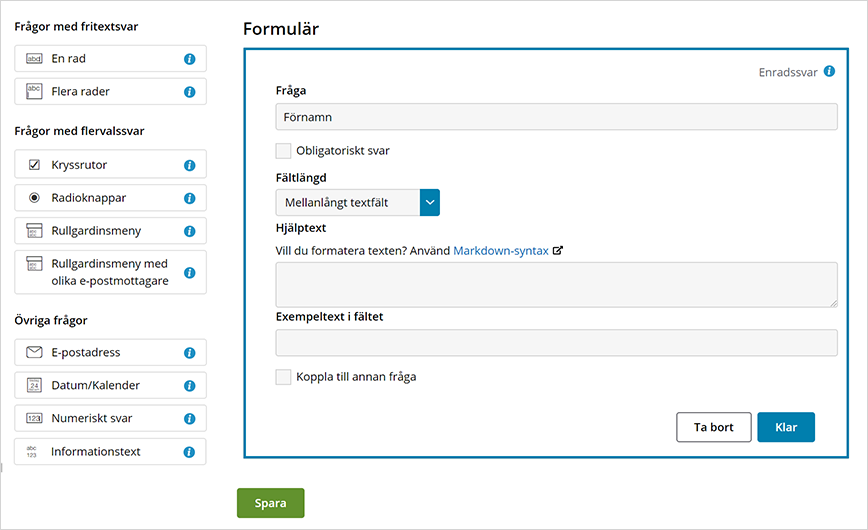
In the first field for each question type, enter the question that the user of the form should answer, Hereafter referred to as respondents.
In most question types, you can set a help text that appears between the question and the response field. You can also enter a pre-filled text that appears in the response field. Note that you should not put important information in that field since it disappears when respondent start to type their own text.
Learn more about the question types here .

When you click on the text "Done", the question box will collapse and the question will appear in view mode. The bottom of the box shows buttons to remove or edit the question.
Use the cross arrow icon at the left in a closed question box, to drag the question to another location in the form. A blue line appears between the boxes while dragging indicating where it can be dropped.
Save regularly!
Save the form by clicking the “Save” button in the bottom of the screen.
When the form is saved it is also ready to take up responses. Saving a form is the same as publishing it on the web! Read more under the heading "Leave answer" below.
Settings
Proceed to the "Settings" tab above the form.
Here you make settings that determine, for example, who can edit the form, who will receive responses via email, which language the form refers to et c.
Learn more about the settings here .
Once you've done your settings, click the “Save” button in the left menu.
Preview
The third tab shows a preview of your saved form.
Please note that you cannot submit forms via the preview. It only adds to show how the form looks.
Show answers
Click the "Show answers" link to the right of the tabs to list the replies sent via the form.
To the right of each listed answer there is a button to delete the answer. Via the button at the bottom of the list you can delete all answers. Remember, however, that the answers cannot be recreated! If they are deleted, they are gone. Therefore, be sure to download them in Excel format first.
Responses containing personal data, such as names, should be deleted as soon as they have been handled. Do not store information for longer than necessary. Read more at Handling of personal data in the KTH web form service .
At the top of the list of answers there is a button to download the answers in Excel format. If you want to sort the answers in a special order or otherwise edit them, this is done in the Excel document.
Keep in mind that if you add or remove questions in a form that has already received answers, the Excel document will group the answers into different versions because the column number is affected.
Leave answer
The "Leave answer" link leads to the completed form. (If the form is embedded in another web page that respondents are refered to, this page is not relevant.)
Show all forms
Via the "Form" link in the link path above the tab row at the top of the form, you will return to the list of all forms you have access to. Here your new form is listed if it is properly saved. If the form is associated with a folder, click on the folder to see the form.
The list of forms
In the list of forms, you will see who created the form, at what time and if it is active (still available for respondents).
For each form there are links to the public form, the received responses and the ability to download the answers in Excel format.
Keep in mind that if you change a form that has already received answers, by adding, removing or re-ordering questions, the Excel document will group the responses into different versions!
Delete forms
If the form is closed, you can also delete it. However, you must actively set the form to be closed under the Settings tab to display the delete link in the list of forms. It is not enough for a form to be closed by limitation of response date or maximum number of responses.
It is not enough to close a form by limitation of response date or maximum number of responses.
Keep in mind that deleting a form will also delete all response data! These cannot be restored! Download all answers before you delete forms.
Copy forms
You can also create a copy of an existing form via a copy link in the list. The copy will include all questions and settings from the original form but not the answers.
Form service in English
At the top right of the header, you can change the language of the service to English. However, keep in mind that the language change only carries the text in the editor interface and does not affect the language of the forms themselves.
If a form is to be in English (and provide information in English when questions have not been answered correctly et c) the form needs to be set as English under the “Settings” tab.
