Start recording in a room
After the preparations for the lecture hall are finished, you as a teacher need to log in to the control panel with your login code and KTH Play account, then select the video source to record for the recording to begin.
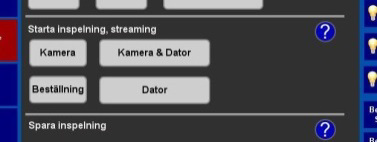
Video source selection information

When you start your recording, you will need to select the video source, i.e. what to record. The video source can be changed during recording without interruption.
The video source options are::
-
Camera: Camera only showing teacher and blackboard. Camera angle and zoom can be set, but remember that students should not be in the picture.
-
Computer. Only recording what is displayed on the screen on a desktop computer in the room or your own laptop.
-
Camera & Computer. Recording of both camera and computer. Alternatively, you can replace the computer with the document camera.
-
Order. Recording according to the ordered combination of sources and layout. Contact IT support to customize the recording to your specifications. This option sometimes has a different name.
Start recording
When the preperations for the recording is complete, you have activated KTH Play so you can save the recording, familiarized yourself with the equipment and gotten your login code to the control panel. You are now ready to start recording:
-
Select "Recording" (“Inspelning”) on the control panel. This button is sometimes called "Inspelning / Streaming" or just "Streaming".
-
Log in with your KTH user, to save the recording in the correct place.
-
Make the final settings of the equipment you are going to use.
-
To start recording, select the button for the desired video source (Camera, Camera & Computer, Computer or Order). Recording starts immediately after your selection.
Pause and end recording
During recording, you will need to pause or end your recording. Read more about how you can Pause and end a recording in a room.
