
The Modules function in Canvas
A course with structure and organisation is appreciated by both teachers and students. The function “Modules” in Canvas will help you, as a teacher, to create courses that are easy to navigate and keep all your course materials in one place in the order you want. You can also set requirements and prerequisites on the modules in order to clarify and control the order of studying.
Modules are structured link collections
With modules, you can create and sort a collection of links and bookmarks to the course content in different places in your course room. Your students will find everything they need in the modules, sorted in the correct order. Without modules, students have to search for the course material under the different headings in the course menu and figure out the order themselves.
Please observe that there is no actual course content in modules, only titles and links to course content. This means that you can change and delete content in modules without affecting the course material. You can, for example, link to a page with instructions in several different modules without actually duplicating the page, the same way as you could link to an external web page several times.
Video tutorial explaining modules
Canvas has a video on how to use the Modules index page.
Modules for course structure: chronological or thematic
E-learning recommends that you create your course structure with modules instead of using the course menu. If all headings are visible in the course menu, the students might find the material in several places, for example both in the module and in Assignments. This can be confusing for the students. If most headings in the course menu are hidden and all the content the students are supposed to use are in the modules, the navigation will be easier for the students.
You can use modules in order to present your course content the way you want, but usually you can use a combination of a chronological and thematic division. It is possible to title the divisions in the modules, and the contents of the modules can be indented differently in order to make a cleaner presentation. The indentations are in the drop-down list where the module objects can be edited.
A chronological division could be naming the modules “week 1”, “week 2” etc., and placing the course content in the order the students should do them.
A thematic division would be naming the modules for example “laborations”, “lectures”, “course information” etc., and using their titles, due dates or a schedule to show the order of execution.
Titles are created the same way as other content is created in modules, which is by clicking on the “+”-button in the module. Find “text header” in the drop-down list, and type your title. After the title has been created, it will appear at the bottom of the module, but you can drag it to where you want to have it in the module.
Control the access to course material
Modules let you control how your students access the course material in your course. You can:
- Assign modules to different people or sections.
- Hide or lock entire modules.
- Set requirements and prerequisites.
Assign modules to different people or sections
You can differentiate content in Canvas by assigning modules to selected people or sections, making the modules visible only to them. By default, modules are shown to everyone, you only need to specify who it is assigned to if you want to deviate from the standard setting.
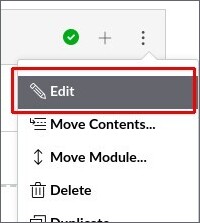
In order to assign access to module, press the options button (three dots) and choose “Edit”.
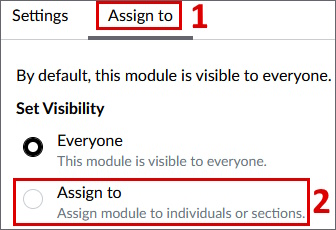
Go to the tab "Assign to" [1] and press the option "Assign to" [2]. Write in who or what sections you want to assign access to this module and then save.
Hide or lock entire modules
The students do not necessarily need access to all of the modules during the entire course. Their access can be restricted by hiding or locking a module. You, as a teacher, can do this by unpublishing a module or by date locking the module using the function “lock until”.
Unpublished module
By unpublishing a module, you hide all the content of the module for the students. This gives you an opportunity to build a structure and to make sure that the module content is correct using the student view, without having to worry about students seeing the content.

Important to know:
- Published course material that is linked in an unpublished module is not accessible for the students even if they are to find the course content through other places in Canvas. For example, if they have access to both Modules and Assignments at the same time. This is why the recommendation from E-learning is to only give the students access to course content through modules, and hiding the other functions in the course navigation menu.
- When you publish the module again, all the content in the module will be published, even if the content was unpublished before you unpublished the module. This will make publishing of content easier since you don't have to publish the pages individually, but please make sure that you only publish what you intend to publish.
Date locked module
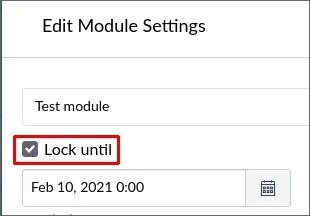
A date locked module is visible for the students, including all of the content headings of the module, but the students can’t open the content until the selected date. In order to date lock a module, press the options button (three dots) and choose “Edit”.
Click the “lock until”-checkbox and fill in a date and time for when the module should be visible for the students.
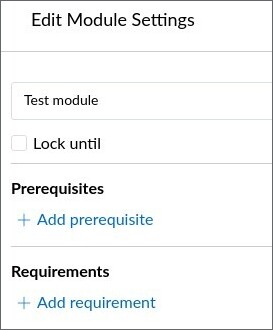
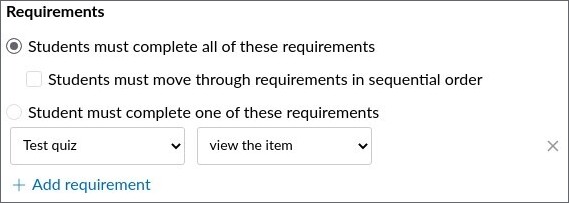
Set requirements and prerequisites
When there is at least one object in a module, you can set requirements for what is needed for the module to be seen as completed. If there are more than one module in the course, one module can be set as a prerequisite to get access to another module. These settings are found by clicking the “Edit”-button on the module, just as for the date locking setting.
Prerequisites and requirements are two powerful tools, but they are useless if they aren’t used properly. Please keep the following in mind to get the most out of these tools:
- The students will only get access to a module if all prerequisites are completed. A prerequisite is always the completion of another module.
- When the requirements of a module are met, the module will be seen as “completed”. A module without requirements is automatically seen as completed.
- A module can only be used as a prerequisite for another module if it is above it in the list of modules.
The module you want the students to complete first has to be earlier in the list of modules, and the modules must have requirements to have any effect. The main idea with using prerequisites and requirements is that you as a teacher can make sure that your students have correct prior knowledge before starting a module. The students will also get a nudge to use the course material you have uploaded.
The requirements will be set individually for each object in the module, and the objects can have any number of requirements. The student can be required to complete all of the requirements, or only parts of them. They can also be required to complete them in sequential order.
The types of requirements you can put on a module depends on the content of the module. The different types are presented in the table below.
| Content type | Show | Mark as done | Contribute | Submit | Score at least |
|---|---|---|---|---|---|
| Pages | YES | YES | YES | No | No |
| Assignments | YES | YES | No | YES | YES |
| Quiz | YES | No | No | YES | YES |
| Files | YES | No | No | No | No |
| Discussions | YES | No | YES | No | No |
| External URL | YES | No | No | No | No |
| External tools | YES | No | No | No | No |