
Availability period and due date
In Canvas, you can choose which people or sections have access to modules, assignments, quizzes, pages and discussions. There are also three date and time settings that manage availability and due date, if required. Here are instructions for how all of this should be used.
Assign to different people
With the function "Assign to" you can choose which students or sections should have access to specific material. This is voluntary, because by default everyone in the Canvas room has access to the material.
You can access the "Assign to" function in different ways in Canvas, depending on the course content you want to assign:
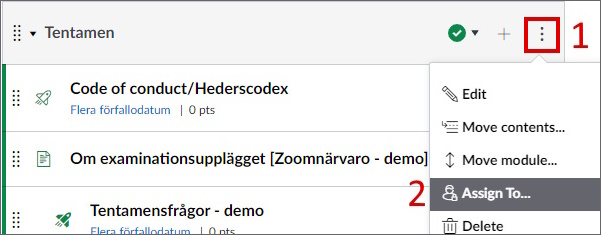
- For modules, you need to press the option button (the icon with three dots) next to the publish button for the module [1]. Then you can select "Assign to" [2] and choose your settings. This also works for the content in the module.
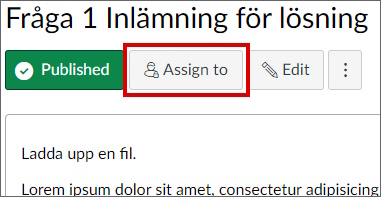
- For assignments, quizzes, pages, and discussions, edit the “Assign to” settings by opening them in edit mode.
- Assignments, pages, and discussions have an "Assign to" button next to the edit button, which opens a sidebar where you can edit the “Assign to” settings.
The three fundamental times
Canvas uses three different dates and times to manage the access of course materials: "Due date", "Available from" and "Until". Assignments, quizzes, and graded discussions use all three, but pages and ungraded discussions only use "Available from" and "To." Modules have none of these time settings.
Under the following headings, an assignment is used as an example to explain how the three fundamental times work.
Note! If you have a course in another time zone than the local one, you have to adjust the times according to the time zone of the course. If you change the time zone of your course (community.canvaslms.com) , you will be able to see both the course time zone and your time zone underneath the different date and time fields.
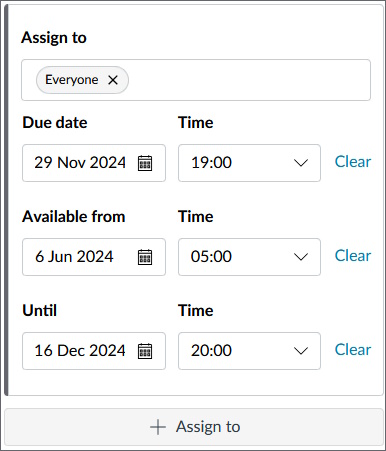
Due date
The due date is the deadline you want for the assignment and also the time shown in the students To-do list (community.canvaslms.com) . An assignment submitted after this deadline will be shown as a “late submission”.
If the assignment is completed in an assignment shell it will already have a set date, that you can change if needed.
The students can submit the assignment even if the assignment is created without a due date.
Available from
"Available from" is the date and time the assignment will become available for the students. The students will be able to read the content of the assignment and submit it. Before this time, the students can only read the name of the assignment.
If the field for "Available from" is empty, the students have access to the assignment as soon as it is published.
Until
The "Until" time and date is when the student no longer can submit the assignment. Quizzes and assignments that the students already started will automatically be submitted at this point in time. Assignments will still be visible after this date, including all of its information.
If the field for "Until" is empty, the students can submit the assignment at any time after they have been given access to it.
Edit multiple assignments at once
After you have created assignments, you can edit the due dates and availability periods on multiple assignments at once.
- Go to Assignments in the course menu.
- Press Assignment Settings (the three dots at the top right).
- Select "Edit assignment dates".
There you can see a list of all assignments and their due date and availability period. In the list, you can edit all dates one by one and press the save button when done.
Batch edit: shift or delete dates
In addition to editing the list, you can also press the "Batch Edit" button to choose to:
- advance the dates of all selected assignments at once. The dates are moved in full days and the time is set at 23:59.
- delete dates from all selected assignments at once. You can choose to delete the due dates, availability dates or both. Nothing else in the assignment is affected.
Remember to save!
Different availability periods for different people
Some students might need a longer time for, for example, an assignments than other students or earlier than others. Students with compensatory support will for example get a 50% longer time for writing exams, i.e., they will get 6 hours to complete a 4-hour exam. Sometimes different sections are assigned the same assignment, but at different times. Instead of creating separate assignments, it is possible to assign the same assignment to different people/sections if you press the "+ Assign to" or the “+ Add” button in date settings.
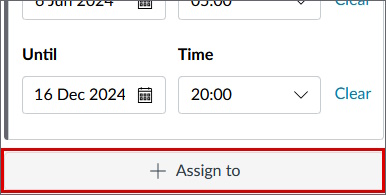
A second setting box will appear underneath the first, where you can add the alternative date and time for availability. Remember to add the right people or sections under the “Assign to” box.
If you want to remove a secondary setting box, click the little X in the upper right corner. You need to have at least one setting box.
Possible warnings and error messages
The most common error messages you may receive when setting the availability period and due date are explained here.
Section missing
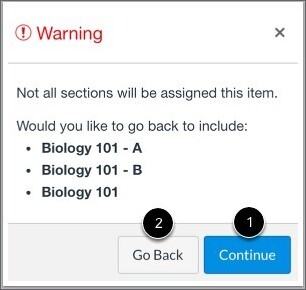
If you don’t assign the assignment to every section in the course (e.g., if you only have assigned one person) and try to save it, a warning will pop up that encourages you to add the missing sections.
In order to ignore the warning, you can press the continue button [1]. If you want to add other people or sections you can press the go back button [2] in order to change your settings and add the missing sections.
Error message for the chosen date
If you choose an invalid date and try to save it, an error message will pop up explaining the issue. Issues with the date could be that the “available from” date is after the due date, the due date is not between the lock date and the availability date, or the dates are after or before the course dates.
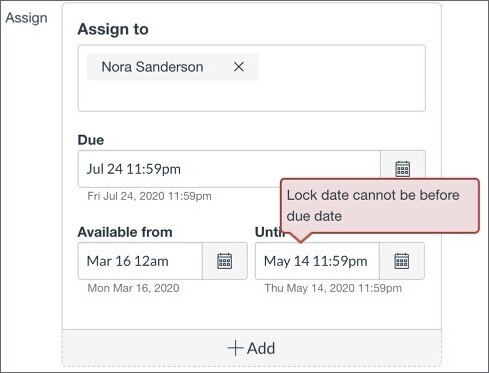
Correct the date and save again.