
E-signing employment contracts and employment confirmations
NOTE: before doing the following steps in Adobe Sign, it’s required that the employment contract / employment confirmation for temporary employment is fully completed and reviewed. Remember to use the new Word template, found here .
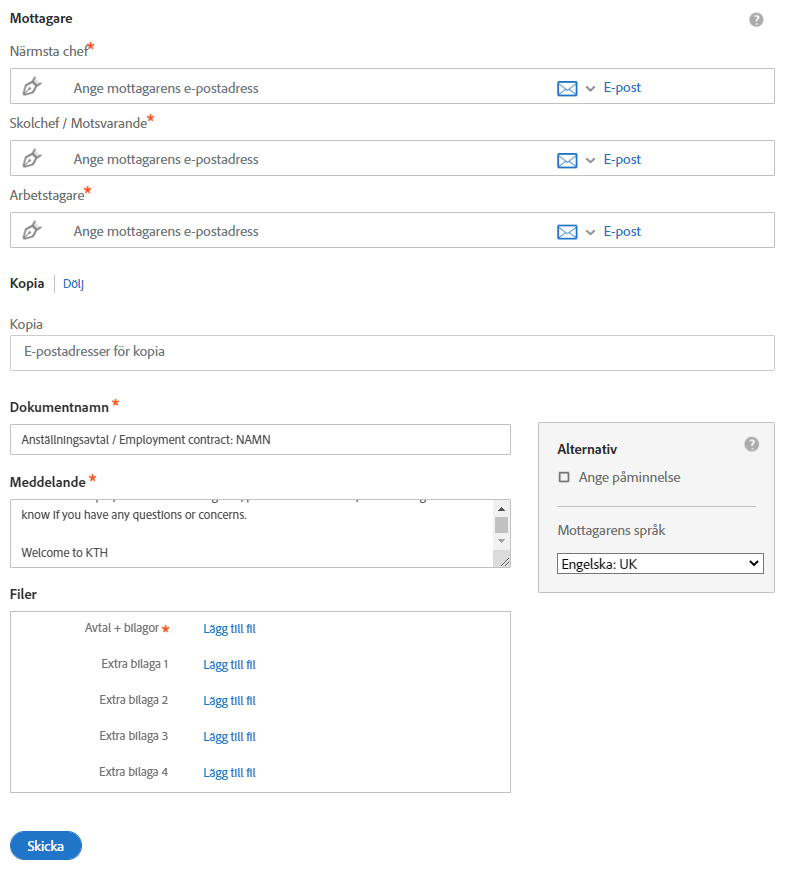
Fill in information for the decision
You will now be taken to the page where you will enter all information for the selected workflow. The routine for employment contracts is detailed below. The routine for employment confirmations is the same except that the “closest manager” does not sign.
1. Specify who should be included in the decision
You first enter the personal KTH-email address for the three roles that are part of the workflow:
- Closest manager (use personal e-mail address, not a functional address such as rektor@kth.se)
- Head of school/equivalent (use personal e-mail address, not a functional address such as rektor@kth.se)
- Employee (the person to be employed)
The one who fills in the information in Adobe Sign and those who sign automatically receive a copy of the agreement when it is signed.
2. Copy / CC
The salary department always gets a copy of employment contracts and employment confirmations. Do not remove their functional address.
- Enter the email address of the person who will transfer the document to the diary W3D3 at your school. (Functional address is OK here)
- If necessary, you can add more people who will receive a finished copy once everyone has signed.
3. Enter the document name
Enter the name of the candidate who is to be employed after the initial text “Anställningsavtal / Employment Contract”
The document name should look like this “Anställningsavtal / Employment contract: Firstname Surname ”.
4. Enter message
If necessary, specify the message that those who are to sign will take part in the e-mail sent and in the signing view. A standardized text is there in both Swedish an English.
5. Upload document(s)
Under documents, click "browse" and choose the right employment contract / employment confirmation that you want signed.
If there are one or more attachments to the decision, add them in the same way.
Note
The documents are displayed to those who are to sign in the order in which they are added, so it is important that the employment contract / employment confirmation is the first document and that the attachments are placed in the order in which they are to be displayed.
6. Send the decision for e-signing
When you have added e-mail addresses to recipients, specified title, message and attached the document, click on "Send".
The document is now sent for signatures according to the specified order. When everyone has signed, the document is sent, as a pdf file, to you, those who signed, payroll, and whoever you have added on CC to file the document into the diary w3D3 at your school.
7. Sign with e-signature
More information about how to sign documents with Adobe Sign can be found in the menu to the left.
8. Expediting employment contracts and employment confirmations
When all parties has signed the employment contract / employment confirmation, they as well as the person who initiated the process will receive a copy of the agreement as a PDF by e-mail.
Payroll at GVS and the people you specified in the CC field will also receive a copy of the completed agreement.
9. Expediting employment contracts and employment confirmations
When all parties have signed the document, it must be transferred to the W3D3 diary system and e-archive according to the school’s own procedures. Remember to add the correct email address in the CC field when you initiate the signature process – that way you don’t have to send a separate copy afterwards.