
Breakout rooms in Zoom
In Zoom there is a function called "breakout rooms", This function allows the meeting host or co-host to divide participants into smaller groups so that participants can discuss separately in different rooms without disturbing others.
Smaller groups in Zoom with breakout rooms
In Zoom, there is a function called "breakout rooms" that allows meeting hosts, or co-hosts, to divide participants into smaller groups during the meeting. You can configure the breakout rooms before opening them to the meeting participants.
Note: To be able to use breakout rooms, you as the owner of the meeting must activate "Breakout rooms" under "Settings" on Zoom's website (kth-se.zoom.us) . Go to the “In Meeting (Advanced)” heading and make sure “Breakout room” is enabled.
Create breakout rooms - during the meeting or from a CSV file
You can create breakout rooms during the meeting, but if you know who will participate, you as the meeting owner can also create them in advance with a CSV file.
During the meeting
To create breakout rooms in a Zoom meeting, you must be the host or co-host of the meeting. If you are, create a breakout room by:
- Click the "Breakout Rooms" button in the meeting control panel. You may need to select “More” first, if you share screens or have a zoom window that is too small.
- Choose the number of rooms to be created and how the participants are divided into them. You can choose:
- Automatiskt
- Manuellt
- Deltagarna får själva välja rum
- Click on "Create".
In advance via the web page - from a CSV file
You can create the breakout rooms in advance with a CSV file of the names of the rooms and the participants' e-mail addresses.
- Create or edit a meeting via Zooms web page (kth-se.zoom.us) .
- Go to “Options” and check the checkbox for “Breakoout Room pre-assign".
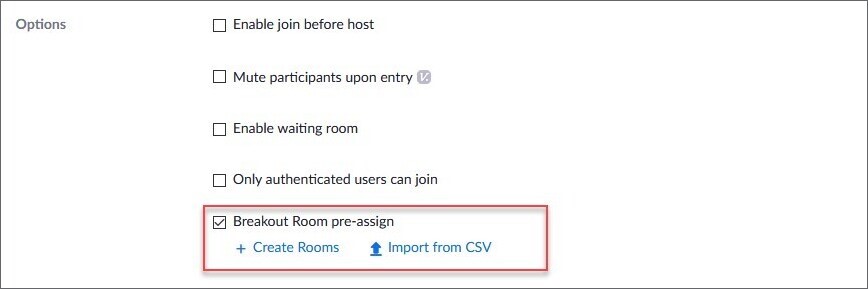
- Choose “Import from CSV”.
- If you need the template, click the “download” link. Then upload your CSV-file.
- Double check that the rooms were correctly made and save.
- Save the meeting.
Now when you start the meeting and click on "Breakout Rooms", you will go directly to the ready-made breakout rooms.
Note: The CSV file must have "Pre-assign Room Name, Email Address" as the top line and all room names and email addresses must be separated by commas, not semicolons. Open the CSV file in e.g. Notepad to see how it is formatted if you are unsure.
Configure and open breakout rooms
When you have created the breakout room, a new window opens where you can see all the rooms in a list, as well as which people are assigned which rooms.
If you place the mouse pointer over the names in this list, you can:
- rename the breakout rooms
- delete a breakout room
- create new breakout rooms
- move people between rooms.
If you want, you can also recreate all breakout rooms by clicking the "Recreate" button.
Under the "Options" button, with a gear as a symbol, you can configure how the breakout rooms should work.
Specifically, you can enable or disable if:
- participants can choose a room themselves.
- participants can come back to the main room whenever they want.
- participants are automatically moved into the breakout rooms when they are opened. The default is that they must accept the request to be moved.
- the rooms close automatically after a certain time.
- You can choose to receive a notification when the time is up.
- a countdown is displayed before the rooms close.
- You determine the length of the countdown (in seconds).
After you have configured the rooms as you want them, open them by clicking on the "Open all rooms" button.
Navigate between and communicate with breakout rooms
You as the host or co-host can always join any breakout room you want, move between breakout rooms or leave them to go back to the main room. Participants can only do this if you gave them permission when you created the rooms.
After you have opened the breakout rooms, the list of rooms will be updated based on which participants have joined which rooms, and you can click on "Join" to join any room. You can easily switch between breakout rooms via this list without having to go back to the main room. You open the list by clicking on "Breakout Rooms", even if you are already in a breakout room. If you just want to leave the breakout room, click on "Leave Room" and then select "Leave Breakout Room".
If you want to communicate with the participants in the breakout rooms, you can use "Broadcast Message to All", which you will find at the bottom of the window with the room list. The message you enter there will be sent to all breakout rooms and will be displayed at the top of the screen. However, the participants can not reply to the message and it is not saved in the chat, so if you want two-way communication, you must go into the breakout rooms.
Close all breakout rooms
You close all breakout rooms at once by selecting "Close All Rooms" at the bottom of the room list window. Note that the default is to give all participants a 60-second countdown before the rooms close automatically, so if you did not change it when you created the rooms, you can expect it to take up to a minute before all participants return to the main room.
The breakout rooms are still there after you shut them down, so you can reuse them during the meeting. You can also edit them again, just like before you opened them.