
Randomize assignments during examinations
In the case of larger, graded assignments, such as an exam, it is often advantageous if the students do not receive exactly the same questions. A suitable method for this is using randomized questions in quizzes and assignments. On this page, we go through an example of such an arrangement and the recommended settings.
Randomize with quizzes, receive assignments submissions
To use SpeedGrader's functionalities to the fullest when grading, assignments need to be submitted in a Canvas "Assignment". However, random questions can only be created in a quiz. In an examination where the students are randomly assigned questions, it is recommended that they receive the questions in a quiz but submit their answers in an assignment. In this way, you can ensure that the students are given different subjects or questions while simplifying the assessment work.
Example of an arrangement
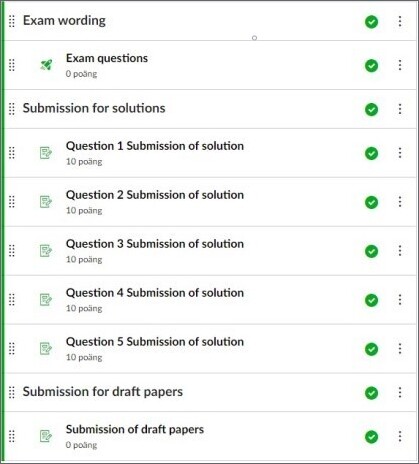
The example we will use on this page is an exam with five questions in it, but the structure can easily be adapted for other exam variations. In our example, the exam assignments are randomly assigned to the students in a quiz called "Exam questions" and submission takes place in separate assignments.
In other words, there are five assignments for submission, one per exam question. There is also an extra assignment where the students must hand in their draft papers, to be able to check the students work. The parts of the exam in Canvas are clearly presented in a module so that the student can easily get an overview of the entire examination.
Step 1: Prepare an item bank or question groups
Canvas has two quiz tools, Classic Quizzes and New Quizzes. Both can be used to randomize questions, but they work in separate ways. New Quizzes uses "item banks" and Classic Quizzes uses "question groups".
Once you have chosen a quiz tool, it is time to create one or more item banks or question groups. Then you fill them with questions that you want to be able to generate randomly. Follow these steps to prepare item banks or question groups according to our example structure:
- Create an item bank in New Quizzes or a quiz with a question group in Classic Quizzes.
- New Quizzes: Create and share an item bank .
- Classic Quizzes: How do I create a quiz with a question group to randomize quiz questions? (community.canvaslms.com) .
- Name the item bank or question group "Question 1".
- Repeat this (but change the name) until you have as many item banks or question groups as questions in the examination. In our example, you should have five item banks or a quiz with five question groups.
Tip! We recommend that you work with this in your sandbox, where you can collaborate with colleagues without the risk of students seeing what you are working on. Do you want to know how to get your sandbox or how you should work in your sandbox? Read more on the page Sandbox .
Step 2: Formulate questions
Now, you need to create the questions that will be randomized for the examination. The goal is that each question in an item bank is equivalent to the rest of the questions in the item bank, so that the exam is equally difficult for all students. For example, all the questions in an item bank can be copies of each other with slight variations of the question text. Get inspiration on how to vary a mathematical question without affecting the difficulty of the question: Examination with random values .
Remember that these quiz questions will only be used to randomize and hand out examination questions, the students should not submit their answers in the quiz. We therefore recommend the question type "True or False" for all questions so that students can mark that they have received the question.
The easiest way to create questions is as follows:
- Go to the relevant item bank or question group.
- Select the "True or False" question type.
- Give the questions a name that can distinguish them from each other for your own sake (this name is not visible to the students).
- Describe the topic/formulate the question. Remember to include some variation of "I confirm that I have received this question" at the end. This helps avoiding confusion linked to the question type, that is, whether the students need to answer true or false.
- Press "Done" and repeat these steps until you have the number of questions you want to randomize between in this item bank or question group.
Repeat these steps for all item banks or question groups.
Tip! When you have created at least one question, you can choose to duplicate it instead of creating an entirely new one. To do this, press the "Copy" button in the upper right corner of the question. In this way, you can make minor variations on the same question in a time-saving way.
Step 3: Create and choose settings for the quiz
To be able to randomize the exam questions, you need a quiz, and that quiz needs to have the appropriate settings. The following headings walk you through the recommended settings for the quiz, for New Quizzes and Classic Quizzes.
For New Quizzes
Create a new quiz and set the following assignment settings (also known as outer settings):
- Points: 0 (zero). Points should be given to the students where they submit their solutions.
- Assignment group: Optional.
- Show grade as: Points (to not confuse this quiz with the submission where the exam results are presented).
- Submission type: Note that the submission type will be listed as "External tool" due to how New Quizzes works, it will not affect anything.
- Anonymous grading: No (The recommendation is that you set up anonymous grading in SpeedGrader instead. Learn more about SpeedGrader in Canvas ).
- Anonymous instructor annotations: No (the function needs to be activated in the Canvas room to be visible). However, the setting is recommended to be used where the students have submitted their answers, which is explained under the heading "Create assignments".
- Assign: Adjust the publication date and time to suit your examination. Set "Due date" to the end time of the examination but set "Available to" so that the quiz is visible half an hour longer in case of any technical problems. You will clearly see in the Gradebook who submitted after the end time.
When the quiz has been created, you can make additional selections under the "Settings" tab. We recommend that you check "Restrict the display of student results". Read more about settings for quizzes at How do I manage settings for a quiz in New Quizzes? (community.canvaslms.com) .
For Classic Quizzes
Set the following settings:
- Quiz type: Graded quiz.
- Assignment group: Optional.
- Options: Only "Let students see their quiz responses" is selected, all others removed.
- Assign: Adjust the publication date and time to suit your examination. Set "Due date" to the end time of the examination but set "Available to" so that the quiz is visible half an hour longer in case of any technical problems. You will clearly see in the Gradebook who submitted after the end time.
Step 4: Add the questions to the quiz
In the quiz for the examination questions, you now need to enter the desired number of random questions from the item banks or question groups. In our example, we choose to add one random question per item bank or question group, but you can randomize several questions if it suits your setup.
You can find step-by-step guides on the following pages:
- New Quizzes: Add or randomize questions from a New Quiz item bank .
- Classic Quizzes: How do I create a quiz with a question group to randomize quiz questions? (community.canvaslms.com) .
Step 5: Create assignments
Next step is to create the assignments where the students will submit their answers. In our example, we have created five assignments, one for each exam question, to facilitate the marking when it is distributed among several teachers. If you want, you can instead just create one assignment and ask the students to submit all their solutions in it.
Please follow our guide on how to create an assignment with appropriate settings that make the examination easier to handle: Settings for examining assignments .
Step 6: Create the structure and move everything to the examination room
The last step is to structure the quiz and assignments and then move it to the examination room (if you worked in your sandbox or course room). We recommend that you create a module and use the layout shown in the example at the beginning of the page. Then you can move the entire module to the examination room instead of having to move the quiz and assignments separately.
For a guide on how to move content in Canvas, read more on the page How do I copy content from another Canvas course using the course import tool? (community.canvaslms.com) .